Friday, July 3, 2015

Amanda Cupcake Red Velvet Cupcake Milkshake!

I am super excited.
As you may or may not know, I live the life of a sweet dreamer..like everything I do is glitter or sugar or sprinkle coated. I even carry sprinkles in my purse so that I can sprinkle people with them when they are having a bad day. I am like a living female Willy Wonka. So I started thinking, why limit myself to cupcakes only? Why not make all kinds of fun food and even beverages inspired by this sweet lifestyle that I live (and I have a feeling you live a very similar one too if you are reading this!)? Just imagine the territory we could cover adding our glittery spell of cupcake love to everything.


Drumroll please... ♥
So here goes my first venture outside of the "cupcake box":  I partnered with Familiar Grounds Coffee Shop to come up with this: The Amanda Cupcake Red Velvet Cupcake Freeze! We sat down and brainstormed the flavors together, then Lucas (awesomely better than barista at FG) made us samples in the back kitchen and we tried them like..10 minutes after coming up with the flavor idea.  We were a successful team, it tastes just like a red velvet cupcake!  Topped with whipped cream and sprinkles.  So here is a reason to visit New London, Wisconsin! Visit Familiar Grounds Coffee Shop and try my newest venture in creating a sweet, dreamy lifestyle!


Or..if you can't make it to a nearby Familiar Grounds..you can always try one at home. this is my recipe from my very own kitchen.

First things first. I partnered with some other fave people/brands for my red velvet cupcake milkshake.  Ben & Jerry's, Betty Crocker Red Velvet Cake Mix, Americolor Super Red, Pyrex, and Kitchen Aid (yes! I used a mixer to whip this milkshake together instead of a blender. Appropriate since we are bakers, right?)


I was thinking ahead. I bought the clearest of clear plastic cups so that I could see the red color from outside when I was all done making the milkshake! Super economical, and also allows you to show your work off. ♥ I dipped each cup in SPRINKLES! (That's a given.. we are trying to recreate a cupcake in the form of a milkshake, why not coat the cup in sprinkles too?!).  I also sprinkled the inside of the cup with edible glitter!


I embraced my inner cupcake queen and PIPED the milkshake into the cup using a professional decorating bag, just like I was frosting a beautiful cupcake. The piping bag worked pretty perfectly actually, it kept everything very neat!


Boom.
A red velvet cupcake milkshake.
My first ever Amanda Cupcake inspired beverage.

I swirled whipped cream on top, and used a decorative straw to hold my red velvet cupcake "shishkabob" on top of the drink.  The cherry on top?! There are always more and more and more and more cherries on top where I come from.  


The Amanda Cupcake Red Velvet Cupcake Milkshake Recipe:
(Makes 2 milkshakes so you can share!)

Ingredients needed:
4 Tablespoons of dry red velvet cake mix (you can keep the leftover mix for a future batch)!
4-5 big scoops of Ben & Jerry's Red Velvet Ice Cream (if you can't find this, use chocolate ice cream)
1/8 teaspoon almond extract
15 mini sized drops of Super Red Americolor Gel Paste
1 tablespoon cocoa
1/2-3/4 cup cold milk
Whipped cream

Accessories needed:
♥Decorative paper straws
♥Maraschino stemmed cherries
♥Sprinkles galore
♥Mini cupcakes using your favorite red velvet cupcake recipe or you can use the box-just buy an extra one or use the leftover mix . 
♥Bowl of melted white candy melts as the "glue" to get the sprinkles to stick to the cup.
♥Optional: Piping bag to pipe the milkshake neatly into the cup.

Instructions:
First, prepare the sprinkled cups:(Hold on:  If you are going to bake mini cupcakes, make sure you bake them before this step so the cupcakes  have time to cool)
1.  Melt white candy melts in a microwave proof bowl for about 45 seconds at a time until smooth.
2.  Pour sprinkles in bowls big enough to dip your cups into.
3.  Once you have all of this prepped, dip the top rim of each cup into the melted candy melts.
4.  Do not wait for the candy melts to dry-immediately dip the top rim of the cup into your favorite sprinkles.
5.  Repeat for each cup.  While the cups are drying, start preparing your milkshake.

Second, prepare the Milkshakes:
1.  Using a liquid measuring cup, measure out 1/2 Cup cold milk.
2.  Whisk Cocoa, Almond Extract, and Americolor Gel Paste into milk.
3.  In stand mixer (using flat beater attachment), whip ice cream and red velvet cake mix together. Then gradually add milk until you reach a  smooth red velvet milkshake texture.

To pour the milkshake into the cup: Fill a ziploc or a piping bag with the milkshake and cut a hole at the end. Neatly squeeze the milkshake into the cup!

Third, have fun decorating your milkshake!1. Swirl with whipped cream topping.
2. Sprinkle.
3. Put a cherry on top
4. Slide mini cupcake onto the straw like you'd do for a shishkabob. I used  a mini star marshmallow to hold the cupcake onto the straw so it wouldn't slide.  Decorate your drink with the cupcake straw.

Enjoy!

Labels: , , , , , , , , , , , , ,

Sunday, November 4, 2012

The Cupcake Dance!

A few weeks ago, a dream of mine came true.

I opened my cupcake shoppe!
And it isn't just any cupcake shoppe.
It is my vision.
A home for my cupcakes.


I call it The Cupcake Mansion because it should be a destination.
A place for people to fill their bellies (and mustaches, hair, skin!) with sugar and frosting and sparkles.  But also a place with purpose, a place that fills you up with happiness like when you were a little kid.  

This is the action. My friends & I preparing the cupcake mansion for lots o love. We were GLITTERIZING the wall in the shoppe. Yes, just throwing sparkles at the wet wall. (People asked how we did it.. we painted the wall with clear glaze and threw glitter all over it while it was still wet. Lots and lots of glitter!)

When I say this place has purpose..
it is more than just about making people happy.
I'm on a mission to use my God given gift of cupcake making to change lives :).  
(which you may or may not have already known, but now I'm announcing it loud and clear!)

(cupcake skirt with glitter hearts!)

I painted some lives with delicious dreams a few days after my successful grand opening!
I hosted a cupcake *surprise* party at my mansion for the New London Girls Dance Team.
22 girls who had just found out they were on the dance team.  Their coach surprised them with a trip here ♥. And the girls thought they were going bowling!   I can't even imagine what a  wondrous shock it was when we threw glitter at them and exclaimed, "Welcome to the Cupcake Mansion!" when they walked through the door! ! ! !

my adorable assistant Billie who helped me throw glitter on the girls!


I taught them how to make rainbow cupcakes and how to make edible gems out of delights like m&ms, peanut butter cups, and Hershey kisses. ♥  I even prepared 22 edible words and ballet slippers out of pink candy melts so their cupcake could dance!

Some of their creations ♥

While I was teaching cupcakes in one room, my fairy godmother (Jane) taught the girls how to make ribbon headbands that they could wear.  (So the ribbons would move with the girls when they danced)!  


An adorable dance team/exchange student from Germany exclaimed the cutest thing ever: "I want to take my cupcake back to Germany!

There was one rule at this party.
If you stepped on the rug in front of the counter of goodies..(inevitable!!) you absolutely had to DANCE ♥♥♥!!


I asked the girls to make up a "cupcake dance".  As I recall it involved a mixer..and the motion of eating a cupcake ♥ Hmm I am thinking cupcake dance flash mob in the near future?! Or a visit from Ellen Degeneres (it is STILL my goal to dance with her and eat a red velvet vegan cupcake with her and her audience)!


Glitter, smiles, sugar, music, dance, cupcakes.
"A laugh is a smile that bursts."
..or so I have heard!:

Sparkly tutus!


Our "toast" to sparkly marshmallows and hot cocoa.


My Irish fairy godmother's sparkly marshmallow and hot cocoa toast:

An Irish Toast to Liars, Cheaters & Stealers:
May you lie your life down for family and friends,
May you cheat death & dishonor at every chance
And may you steal the hearts of those you love all life long.

The girls enchanted by her Irish toast ♥.

During the party I stepped back for a second to watch everything happening. And that was just it. This dream of a cupcake mission was "happening."  My glittery cupcake heart was being shared with 22 amazing girls.    

Their completed cupcakes on the cupcake skirt♥
Wrapped up in that little cupcake liner was a memory of a lifetime. D

Learning all about Amanda Cupcake ♥ on my wall of fame :)

Maybe you should make a wall of fame.
It really highlights all the wonderful people & experiences you meet when you take on life's adventures, no matter what they are!    Do you have any idea of how rewarding it is to use all your seconds and minutes in life to do good for the world..and then sit back and watch it all unfold!? (or perhaps,  watch it dance in this case). 


Labels: , , , , , , , , , , , , , , , , ,

Monday, September 17, 2012

Pumpkin Pie Pop Tart Cupcakes

I've been reminiscing about my past summer. (All the weddings my cupcakes have attended)!!!  And I plan on continuing with that.♥  But I also have to live in the present moment.

Can I just say I am so stoked and most importantly...grateful?!
This is me beaming in the reflection of my new shiny double convection oven at the Amanda Cupcake Mansion. ♥ It even says "PRO" on it. (The pressure's on now)!
 
As of Friday morning (September 14th) my little cupcake estate was approved by the health department. This is my new kitchen.
 
My "fairy godmother" and I had a toast over Cupcake Wine and cupcakes to celebrate!
 
I even have a view to the outside world while I make cupcakes for you♥
 
This was moving day.  I used to store my entire kitchen under the basement stairs of Cronie's in Waupaca, using crates as makeshift shelves in the basement.  You ask how I stay thin making delicious cupcakes?  Here's your answer. I ran up and down the stairs to get my supplies, all night long.   (FYI, there is glitter foreverly imprinted in the wood of the stairs. I left my mark at Cronie's).
 
And..believe it or not..I made thousands of cupcakes out of this pretty historical single rack oven out of the Cronies kitchen. (I'll never ever forget where I started).  The secret to making sure my cupcakes were baked evenly with this oven?  Making sure the temp was turned down to 250 degrees and rotating the cupcake pans every so often.
 
Now you see why I was smiling in the reflection of my new oven.  With a few tear droplets coming out of my eyes too ♥ It was a *moment* in my time here as Amanda Cupcake.
 
Ok. So you want to know where the cupcakes are.
Here are some that I made right before my move:
Pumpkin Pie Pop Tart Cupcakes
to celebrate fall.
They are cupcakes that taste just like pumpkin pie..with pumpkin pie pop tarts baked inside!
 
I cut up pumpkin pie pop tarts into little squares. The pop tarts are popping out of the pumpkin colored cupcake..just like they pop out of the toaster!  The sprinkles I added look like they are falling off of the pop-tart. ♥
 
This is what the pumpkin pie pop tarts look like baked inside of a cupcake. Baking a pop tart inside of a cupcake is easy, and after they are baked inside of the cupcake they taste like little pies! 
 
Step by Step:
1.  Cut your untoasted pop tarts up into little squares using a serrated knife. 
2.  Scoop a small amount of batter into the bottom of a cupcake liner and place the pop tart square on top of the batter. 
3.  So the pop tart square is a surprise..I hide it by pouring more pumpkin pie batter over the top of the pop tart!
 
 
Now the recipe for the cupcakes so you can try this at home:
 
Pumpkin Pie Pop Tart Cupcakes ♥
 
Ingredients:
1 box white cake mix
1 (14oz) can of Pumpkin Pie Filling
1 (4oz) box of vanilla pudding (or you can experiment and try other fun flavors like cheesecake, white chocolate, etc).
1/4 tsp nutmeg
1/8 tsp ginger
2 tsp cinnamon
1/3 cup of vegetable oil
1 1/4 cup buttermilk or milk
3 eggs
Box of Pumpkin Pie pop tarts

My main ingredients in everything I bake:
Patience, Sparkles, and LOVE.

Directions:
1. Preheat your oven to 350 degrees.
2. Prepare cupcake pan with cupcake liners.
3. Pour your cake mix and pudding powder in stand mixer, whisk until combined.
4.  Gradually add remaining ingredients and mix on medium-high for 2 minutes, making sure to scrape down the bowl to incorporate all the ingredients.
5.  Pour batter into tins.
6.  You can place a piece of pop tart in each before baking if desired. Bake for about 15 minutes or until a toothpick inserted into cupcake comes out clean.
7.Once cooled, top with frosting and poptart.


Tip for the pumpkin pie pop tart cupcakes:  Because there is so much delicious heavy pumpkin action going on inside of the cupcake batter, the pumpkin pie cupcakes are dense & don't rise very high.  You can fill the cupcake liners almost 3/4 full.


Cream Cheese Frosting:
8 oz of Cream Cheese
8 oz unsalted butter
3-5 Tablespoons Heavy Whipping Cream
1 Tablespoon Vanilla Extract
3-4 Cups Powdered Sugar
 
1.  In a large bowl, whip your Cream Cheese & Butter together until creamy.
2.  Add Vanilla Extract and Heavy Whipping Cream.
3.  Gradually add Powdered sugar.  For a more "fluffy dreamy" frosting swirl, use about 2-3 Cups Powdered Sugar.   For a stiffer frosting consistency (good for piping texture), use 3-4 Cups Powdered Sugar.

Labels: , , , , , , , , , , , ,

Tuesday, July 26, 2011

Cinnamon Rolls in Cupcake Liners inspired by Grandma Fran ♥

Cinnamon rolls always remind me of my grandma Fran.
Her kitchen was always warm.
My grandma would pull the gooey goodness out of her oven like magic.
And just like that...the magic would disappear! Into my tummy.

This one is a tribute to my grandma.


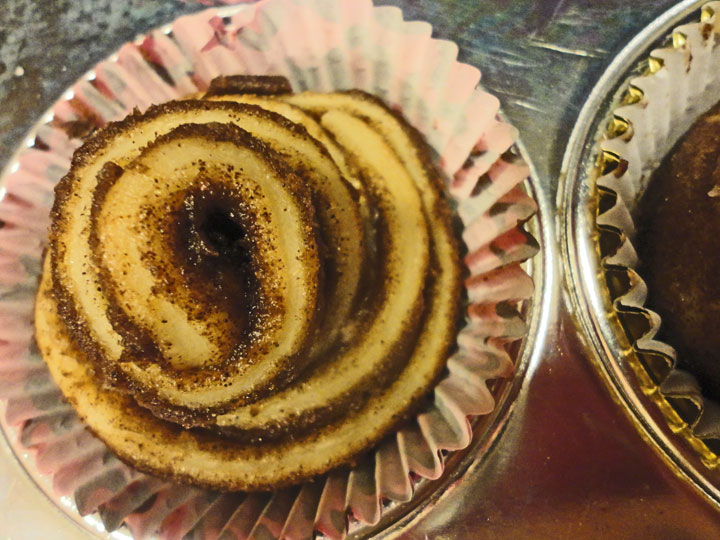
Cinnamon Rolls disguised as a cupcake in a pretty liner.
Shameless indulgence.
Unafraid of butter.


First I picked out a pretty cupcake liner.


This was my big ball of dough that was too impatient not to rise. Inside of a bowl for about an hour.

A Heap of Love (interpretation: 2 1/2 Tablespoons of cinnamon!)


A sinfully amazing combo of brown sugar, cinnamon, and butter. I add even more butter than the recipe calls for.  That was one of my grandma Fran's tricks.  Look how thick and gooey and delightfully naughty this looks. It was so gooey I was able to draw a heart in all of the cinnamonaliciousness!


Look how pretty they are before baking. I will almost hate to cover with cream cheese later!


Early to Rise. This picture was taken at about 5am.  The sun rising, birds beginning to chirp, the warm smell of bread & cinnamon.  Grandma Fran's spirit alive in my kitchen. ♥

I adore that these cinnamon roll cupcakes rise "upward" like little edible towers. (It's because of the cupcake liner).


I always try to make the cinnamon rolls look pretty after. I don't let them cool before adding the cream cheese frosting.  I immediately use a frosting spatula to spread the frosting on, so it turns out like a glaze. This way you can still see the shape of the roll underneath the frosting.  Then of course I add some edible sparkly-ness. Sparkles do such a great job of accenting the cinnamon!


Grandma Fran's Recipe (all inside one cupcake liner..living the dream!)

Ingredients:

Cinnamon Rolls:
1 packet dry active yeast (7 grams).
1/2 cup granulated sugar, divided
1 cup warm milk
2 eggs
1/3 C soft butter
1 teaspoon of salt
4 1/2 cups of bread flour

Cinnamon Roll-icious Heaven:
1 C of Brown Sugar
2 1/2 Tablespoons of ground cinnamon
1/3 cup melted butter


Instructions:
1.  Line cupcake pan with 24 liners.
2.  Take out a large bowl.
3.  In this large bowl, dissolve the yeast and half of the granulated sugar in the warm milk.  It will turn foamy after about 10 minutes.
4.  Add the eggs, butter, salt, and the rest of the sugar.  Add flour and mix until the dough turns into a ball.
5.  Put your big & beautiful dough ball in a bowl, cover, and let it rise for about an hour. (Dough balls rise the best in warm environments).
6.  Your dough ball will double in size after about an hour.
7.  Turn your dough out onto a floured surface, cover again, and let it sit for another 10 minutes.

**Meanwhile, you can mix part of your Cinnamon-Roll-Licious Heaven in a small bowl.  (The brown sugar and cinnamon).

8.  Roll dough into a large rectangle. (12x22 approximately).
9.  Now it is time to have fun with your Cinnamon-Roll-Licious Heaven.  Paint the melted butter on your dough (I actually add butter to both sides of the dough.  You can use as much melted butter as you want. I use more than 1/3 Cup.  My grandma used to *pour on the butter* and her cinnamon rolls were amazing!
10.  Sprinkle the Brown Sugar and Cinnamon onto your buttered dough. It will be sticky, gooey, delicious looking. And the smell..oh my. You can even draw shapes in it like I did if you are a big kid like me.
11.  Roll up the dough and cut into 24 little rolls of indulgence.
12.  Place rolls in cupcake liners and let rise for about 30 minutes (the longer you let the dough sit, the more it will rise. Not quite I Love Lucy breadmaking style though, so don't worry). I let mine sit overnight sometimes and get up early to make them for breakfast!
13.  Bake rolls in an oven preheated to 400 degrees for about 10 minutes. 
14.  If you want a "glazed look" like my photos above, add the cream cheese frosting right away.

Cream Cheese Frosting:
My cream cheese frosting recipe is a sweet little secret locked inside of my brain and I never write it down.  I just kind of make it, and it is magical. You should use a special cream cheese recipe  from someone you love ♥ .  That will make your cinnamon roll cupcakes even more special.


Labels: , , , ,

<data:blog.pageTitle/>

This Page

has moved to a new address:

https://theamandacupcake.com

Sorry for the inconvenience…

Redirection provided by Blogger to WordPress Migration Service