How to throw a Cupcake Party fit for a Snow Queen ♥
People always ask me...
"Why do you share your baking tips with others?"
Because I love to teach, and I believe everyone has their own style when it comes to baking and decorating cupcakes. Every cupcake is an original. I haven't always been a Cupcake Queen. I was a Cupcake Student at one time too! Some of my favorite online bakers that I learned the most from are I am Baker and Bakerella. Because I've learned from others, I pass on the knowledge. Pay it forward ♥

This early winter, I taught two cupcake classes at the Royal Palace, Givens Farm in Hortonville, Wisconsin ♥ The theme: By popular request..Disney's movie "Frozen". The ambiance was perfect. Glittery snowflakes were falling both nights I taught classes.

I even wore glittery eye make up and a braid to look like Snow Queen Elsa.


Have you seen the movie yet? I enjoyed watching Frozen because while it channeled my love for classic Disney Princess nostalgia for the first time in a long time (think Sleeping Beauty, Snow White), Frozen empowered Disney princesses in a very different way than any other Disney princess movie has!
♥
Plus..there is this snowman named Olaf who makes the movie worth watching. Snow Queen Elsa creates him with her snow queen magic. It is the first time since Frosty the Snowman that I have wished for a snowman as a best friend. Olaf is the kind of fun snowman friend that would take a sunny tropical vacation with you. You have to watch the movie to understand!

I shared some of my Cupcake Queen magic with the class, and we all created our own Olafs. His huge smile made all of us smile.

His nose was made out of Cheddar Bugles. They look just like carrots! Using a clean pair of scissors, we cut them down to fit the size of his sweet cupcake face.

On a pan lined with parchment paper, we poured melted chocolate candy melts into a disposable piping bag or ziploc bag and cut a tiny hole at the end of each baggy. We piped out the little "branches" for the top of his head onto the parchment paper. We used the same technique to make the big smiles. While the chocolate "smiles" were still wet on the parchment paper, I centered a piece of Trident gum on each chocolate smile for Olaf's tooth. Candy melts dry really fast, but I like to "set" all of my pieces in the refrigerator when I am done piping because all the little pieces of handiwork are very fragile and they tend to break if too warm. The colder the little chocolate pieces are before you handle them, the harder they are and the less likely they are to break apart or melt.

Since I am super detail oriented, I piped Olaf's famous eyebrows on his little edible sugar eyes using the melted dark chocolate candy melts (you can find the sugar eyes at local cake decorating stores).
Look at how many Olafs I had in the kitchen with me when I was practicing for my class! Every Olaf will look different, but I think that's what makes your hand-crafted Olaf cupcake charming.
♥

When throwing cupcake party classes, I love using these little painters palettes to put the sprinkles and edible gems in! You can place your cupcake in the center of the palette as the centerpiece. Some of my favorite sprinkles for a Frozen Cupcake class: Mini Snowflake Sprinkles, Edible Pearls, Chocolate Covered Blueberries, Disco Dust, Hot Pink Nonpareils, and Lavender Sixlets that look like giant pearls.

As a class we made handmade "Frozen" hearts and princess names by piping them freehand onto parchment paper. (Hint: If you're not great at freehanding, you can find any shape clipart you desire on the internet. Parchment paper works awesome as tracing paper. You just print the clip art out on a piece of paper, place under the parchment paper, and trace over the art onto the parchment paper with your candy melts).

Elsa, Anna, and Olaf.

Remember those princess dress cakes from your childhood? We recreated those princess dress cakes as cupcakes! ♥ All you have to do is find your favorite picture of your favorite princess..and glue the paper doll to a toothpick. Once you have frosted your cupcake to look like a puffy ruffly princess skirt, you can insert the paper doll.

The perfect flavor for a Frozen themed cupcake class?
Blueberry Velvet cupcakes.
Rich, Royal and "Iced" for a Snow Queen.

Recipe for Blueberry Velvet Cupcakes here.
Recipe for Fantasy Rainbow Frosting Swirls and Buttercream Frosting here.

The lavender colored cupcakes remind me of Anna more than Elsa. I used a dot of Americolor Regal Purple Color Gel Paste in white buttercream to achieve this color!

I love using oversized chocolate covered blueberries on top of the cupcakes. Edible gems!

Student Art! Pretty amazing!
Last but not least....
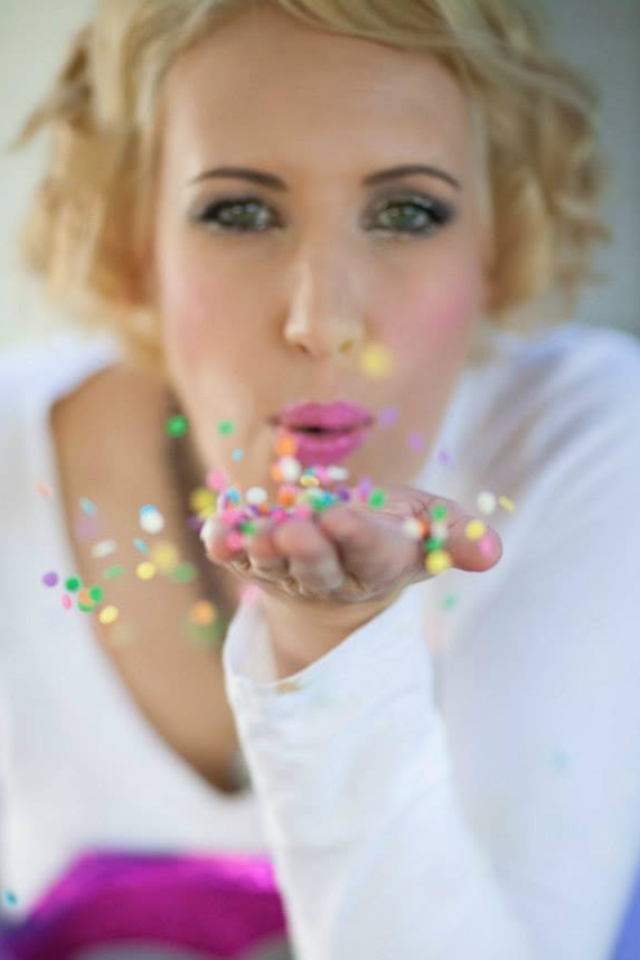
(She who leaves a trail of glitter is never forgotten)...

Each student received a capsule of non-edible glitter as a gift (and a warm hug) from me! At the end of class, we each opened a capsule of glitter and threw a fistful of glitter into the wind/snow. If that won't make you feel like a Snow Queen, I don't know what will. I told the students to feel free to make a wish as they were throwing the glitter. (I found the glitter in cute little capsules like this at the dollar store-nail art actually, but perfect for this occasion).
♥
Labels: Amanda Cupcake, Anna, Classes, Cupcake Tutorial, Cupcakes, Disney, Elsa, Frozen, Givens Farm, glitter, Rainbow Cupcakes, Snow Queen Cupcakes, Winter Cupcakes, Wisconsin
posted by Amanda Cupcake @ 9:20 PM
4 Comments
![]()
![]()


4 Comments:
Love all the tips! What a beautiful and fun Frozen cupcake presentation!
All the cupcakes are looking delicious, especially that frozen themed one. I am also planning a themed party at venues in DC and will definitely consider your cupcakes ideas for my party. Thanks for great share.
Blog muito bonito, de qualidade, e os cucakes então? Espetacular! Também fiz um sobre essas delícias. http://cupcakenew.blogspot.com.br/ Muito sucesso a vocês!
Blog muito bonito, de qualidade, e os cucakes então? Espetacular! Também fiz um sobre essas delícias. http://cupcakenew.blogspot.com.br/ Muito sucesso a vocês!
Post a Comment
Subscribe to Post Comments [Atom]
<< Home