A true story & recipe by: Amanda Cupcake
One Starry Starry Night while everyone else was dreaming, I swirled fantasies on top of cupcakes.
Little fantasies that tasted like vanilla almond rainbows. At the first warm & colorful bite of my rainbow cupcake creation, I "remembered" that I had "forgotten" a wild food fantasy from the days before anyone ever called me Amanda Cupcake.
♥
Back in my angsty teen days, I was a painter. Art was my favorite class, painting was my outlet. Even back then though, my instincts yearned for something beyond paint. I wished that I had the tools to create *edible* art that had never been seen before. Paint that I could eat. I started envisioning a new colorful creation. Ice cream themed after famous paintings. Like Van Gogh's Starry Night--inside of an Ice Cream Carton. I envisioned myself opening the carton to reveal a frozen replica of my favorite legendary painting..as ice cream. I thought that the neatest thing ever would be if I could dip my spoon into a soft dairy canvas, and as the ice cream melted, the "paints" would blend together into brand new colors I never even knew existed. Sort of like Superman Ice Cream..but more "fantasy" than comic strip.
♥
Wow..so....
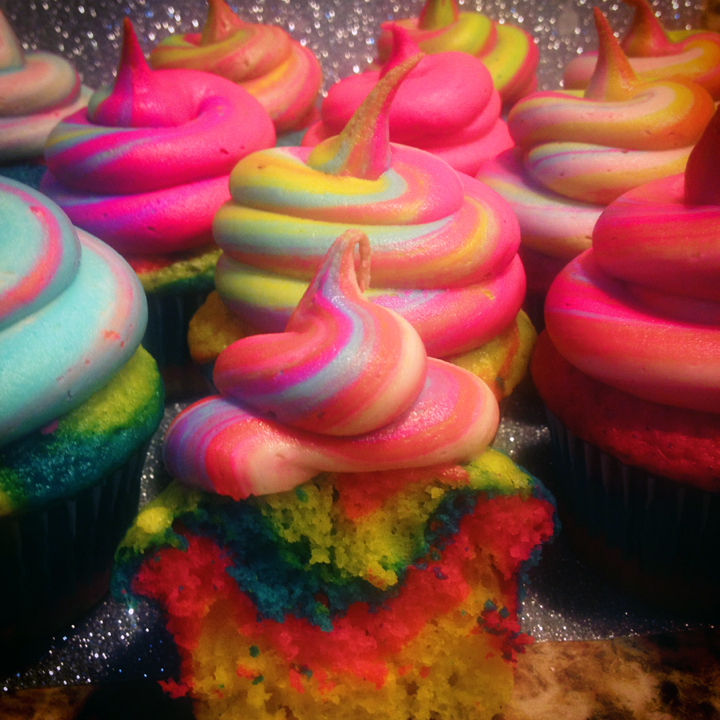
My rainbow fantasy cupcakes that I dove into, buttercream first.. were a real life version of "paint that I could eat." My teenage fantasy come true. Even though this wasn't ice cream, the colors in the frosting and inside of the cupcakes evolved with every single vanilla almond bite. Just like my vision.
And the best thing ever...I actually did create these cupcakes on a starry starry night. The starry starry night can be recreated on the cupcake by lightly sprinkling Hologram Silver Disco Dust on top of fresh frosting!
Disco Dust: There have been many questions about the Disco Dust being "edible". Here's my answer: I use it on the cupcakes on my blog to make everything look super sparkly and fancy. I don't sit down and eat it by the spoonful. It sells at my local cake decorating supply store, and I put it on top of things that you can remove from the cupcake. You can use crystal colors pearl dust or use crystallized sugar sprinkles that are at your local bulk food supplier, I do that for the cupcakes I use in production to get the same effect. If you think about all the things people eat or drink in this day and age, a little bit of glitter is pretty innocent, so if you want to sprinkle a tiny bit of disco dust on your cupcake, I know from experience working with it and eating cupcakes that have it on it for several years that it basically just passes through your system harmlessly. You might end up with a little bit of "unicorn" glitter poo.
♥
You too..can make Vanilla Almond Rainbow Fantasy Cupcakes:
Your Fantasy Vanilla Almond Rainbow Cake Mix Recipe:
- White Cake Mix (no generic labels, brand names only)
- 1 1/4 Cups Buttermilk (in place of the water on the box)
- 4 eggs
- 3.9-4 oz White Chocolate Pudding in Dry Powder Form (the pudding gives it that "from scratch" texture).
- 1 1/2 teaspoons of Pure Almond Extract
- 1/2 Cup Vegetable Oil
- Disposable Piping Bags (for layering the rainbow colors on top of each other in the cupcake liners)
- Light colored cupcake tin (a light colored tin works better than dark so that your bright colors don't brown when baking)
- White Cupcake Liners (this recipe makes about 12-15 cupcakes)
- Oven, Preheated to 325.
A friend is always good to bake with. ♥ I'm lucky to have two of the cutest little friends ever, Hanna and Rainy. I call them my "Mini Me's'"
My edible paint colors that I swear by for fantasy rainbow cupcakes and their frosting. Americolor Gel Paste in Electric Pink, Electric Yellow, Sky Blue. (You can buy these
here or at a local cake decorating supply store).
Step 1: Combine all ingredients in stand mixer and whip together well using flat beater attachment.
Step 2: Take out 3 separate bowls and pour about 1 1/2 Cups of batter in each bowl.
Step 3:
♥For Sky Blue: Mix two small drops of Americolor Gel Paste in one Vanilla Batter Bowl.
♥For Electric Pink: Mix three to four small drops of Americolor Gel Paste in a separate Vanilla Batter Bowl.
♥For Electric Yellow: Mix three to four small drops of Americolor Gel Paste in a separate Vanilla Batter Bowl. (I use more drops of color for the yellow and the pink so that the colors are really vibrant).
Step 4: Stop and gaze at the beauty of your bright batter colors in each separate bowl.
Pour each color of batter into a separate disposable piping bag, and cut a small hole at the end of the piping bag.
♥Cover the bottom of your cupcake liner with electric yellow batter.
♥Repeat by piping electric pink on top of your electric yellow batter.
♥Repeat again by piping Sky blue on top of your electric pink batter.
♥Now you can add little swirly swirls of extra color, until your cupcake liner is filled 1/2 full.
♥Bake at 325 for appx 18-22 minutes, until a toothpick inserted in the center comes out clean.
..and taste test. I did. The cupcake is...gone!
Look how pretty the cupcake liner looks alone! You don't even need to buy the fancy schmancy ones at the store. This started out as a plain white cupcake liner.
The Pastel Rainbow Fantasy Frosting technique:
(it's truly magical).
REAL BUTTER IS LOVE ♥
I use a homemade buttercream for the best swirl texture.
1 Lb of Unsalted Softened Butter in my Buttercream Recipe ♥
I swear by Marshmallow Creme as the base for my frosting.
I use 13-14 oz in my frosting recipe.
See full recipe for buttercream frosting below.
♥Just a reminder of how pretty the frosting is♥
Just like my batter, I separated my frosting into 3 bowls.
Then I mixed each gel paste color into a separate bowl (about 3-4 drops per bowl--you can always add more color if you want the color to come out more vibrant).
Electric Yellow, Electric Pink, Sky Blue.
Hint: If you want your frosting to look more "Unicorn-esque" like these cupcakes... (these colors remind me of Unicorns!), I use white in place of yellow. Or still use the yellow but add white too as a 4th color.
To pipe a multi-color rainbow swirl: I stacked each color of frosting on top of one another inside of a disposable piping bag. ♥ Your piping bag will look so pretty from the outside, like this!
This is the view from the inside of the piping bag, as I am stacking the sky blue, electric pink, electric yellow buttercream frosting colors on top of each other.
For a dreamy puffy fantasy swirl, I use a round Wilton 1A Piping Tip like in the picture. Before you stack the frosting inside of the piping bag, cut a hole in the end of the piping bag big enough to fit the tip, and slide the piping tip down into the end of the piping bag.
♥No cupcake will look the same. When all three-four colors blend together inside the piping bag you'll start seeing greens, purples, turquoise colors swirl a fantasy rainbow onto your cupcake!
♥Where you might need patience: For the brightest colors possible, switch piping bags every time your piping bag runs out of frosting. This prevents colors from turning muddy or brown.
The final product. My signature rainbow fantasy cupcakes.
Maybe this summer..fantasy rainbow ice cream cupcakes?! ♥♥♥
Marshmallow Creme Buttercream Frosting Recipe:
13-14 oz
Marshmallow Fluff or Cream
1 lb butter
1 T Vanilla
Extract
Dash Salt (to lessen the sweetness a tad)
8 Cups Powdered Sugar (depending on how thick you want your frosting to be-use less for creamier frosting and more for thicker swirls)
- Use a
spatula to scrape the fluff and the butter out into your stand mixer.
- Mix well
until fluffy and well blended.
- Gradually
add a pinch of salt and vanilla extract.
- Now add your
powdered sugar, slowly until the frosting reaches desired consistency.
- (The more
powdered sugar you add—the more stiff the frosting will be for decorating).
End of the blog BONUS:
Some may also call my rainbow cupcakes "Unicorn Poop" Cupcakes. Or you can just make Unicorns out of these cupcakes like I did here! I used Bugles as the horns, sugar eyeballs as the eyes, marshmallows cut in half for the nose and I drew the faces on the 'mallows with an edible ink marker. Last but not least, I used little rainbow colored licorice pieces for the ears! Reminds me of the "Fluffy Unicorn" in Despicable Me!


.JPG)