Tuesday, February 10, 2015

Eggless Sugar Cookie Dough, one of my BFFS.♥

Definition of a BFF in my world:  A cupcake's best friend.
Every cupcake needs a BFF in a world full of fluff.
Yesterday was one of those days for me.

Whenever you put yourself out there like I do, you will be paid in return with LOVE. But when you pour your heart and soul out to the public, sometimes you'll receive the opposite.  It is a risk you take, especially when you blog,  become a business owner, or voice your dreams, wishes, and opinions to the public.  This week I received a statement on my public blog saying that I don't care about my fans because I haven't been on my blog lately.   I won't go into details as to why I've been a bit behind, but I plan on doing some really wonderful things going forward.  ♥   I think their statement stuck out to me more than any other critique could have because I do everything one girl can to share my love of baking with you, I've dedicated the past 4 years of my entire life to do that and want to dedicate the rest of my life to doing amazing things to share the love of what I do with others. I recently told someone I wanted my cupcakes to change lives and I want to prove that it can be done!   I have a whole plan and I want you all here with me ♥ I've already shown that it can be done, little by little.  I've made cupcakes with Girl Scouts of America, the Make A Wish Foundation, the Sibling Network of Wisconsin, and delivered cupcakes to people with leukemia to cheer them up.

So I made a little sign dedicated to moving forward:
(Thanks to T-Swift for the inspiration)


And here's a long awaited recipe for you...
One of my favorites that I created out of an Amanda Cupcake BFF
(Sugar Cookie Dough):
\

 ♥
Eggless Sugar Cookie Dough, Recipe:
(You can roll this into balls, poke with sticks, and dip into chocolate and sprinkle with LOVE like I did above, scoop on top of cupcakes with an ice cream scoop like a big ball of frosting, or eat right out of a jar...or a bowl.. or off of a spoon. I could go on and on and on. It's amazing, really):

Ingredients:
1 Cup Butter (softened)
1 Tablespoon Pure Vanilla Extract
1 Cup Flour
1 Tablespoon Vanilla Malt Powder
1/2 tsp salt
2 Tablespoons Milk or Almond Milk
4-6 Cups Powdered Sugar

Cream the butter and milk together in a stand mixer, using flat beater attachment.  Gradually add remaining ingredients (except for the powdered sugar).  When ingredients are creamed together, gradually add powdered sugar until you reach desired sweetness or desired texture.  If you are rolling into balls to dip into chocolate or candy melts, you will want the texture to be sticky like play-dough.  If you are going to scoop on top of cupcakes, you want the texture to be just like sugar cookie dough (as pictured above).  If you are just going to eat it out of the bowl, add just enough powdered sugar so that the dough tastes sweet enough for you!

To make the cookie dough balls:
Roll the sugar cookie dough balls by hand:  Using your hands, roll into 1 – 1 1/2”  balls and set on parchment paper lined baking pan.  Refrigerate for appx 1 hour.  Refrigeration helps harden the cookie dough balls so that they are solid enough to coat with candy melts.

Melt candy melts.  In microwave proof bowl deep enough for dipping, melt candy melts, in 15-30 second increments in the microwave, stirring in between until melted and smooth.  Do not over microwave or candy melts will burn and harden.

"Glue" sticks into truffles using melted candy melts. (I enjoy using mini wooden popsicle sticks for the cookie dough pops).  
Dip the tip of each stick  into melted candy melts, and insert this end of the stick all the way to the bottom of each cookie dough ball. Repeat for all cookie dough pops and let the edible candy melt “glue” set for appx 5 minutes.

Dip sugar cookie dough balls into melted candy melts:  
Holding onto the stick, cookie dough ball upside down,  dip each pop into bowl of melted candy melts and lightly spin, to coat the entire ball with candy melts.  Hold cookie dough pop upside down and let excess candy melt drip off. Stick the bottom of the cookie dough pop onto parchment paper so it can sit flat on a pretty platter.  While the candy melts are still wet, sprinkle with rainbow heart sprinkles or your desired sprinkle of choice. 

♥ 

Labels: , , , , , , , , , , , , , , , ,

Friday, August 30, 2013

Mountain Dew Doritos Cupcakes & Cake Pops♥

I visit kids all over Wisconsin on a mission to teach cupcakes.
The last two places I taught cupcakes to kids (young and old) were the New London Middle School and the McMillan Memorial Library in Wisconsin Rapids!

Kids inspire me.
And when I teach them cupcakes..
I remind them to value their imagination forever.
It is probably one of the most valuable gifts every single one of us is born with.

My imagination is how I came up with this cupcake:♥

Mountain Dew Doritos Cupcakes


and/or

Mountain Dew Doritos Cake Pops!


Mini bite sized Dorito/Mountain Dew Cupcakes. ♥♥♥ I like these because you get the flavor in your mouth all in one pop. 


Inspired by all of us (young and old) who have been busted with our hands in the bag of Doritos, cheesy fingers (and all while drinking a sugary soda). It's too good to be bad.  Too savory to be sweet. Too sweet to say no to ♥


See all these happy kids about to learn all about the art of mixing Mountain Dew, Doritos, and cupcakes?! (At New London Middle School).  They all agreed with me that Mountain Dew & Doritos are the perfect after school snack combo.

After I shared a fun try-at-home recipe with them.. the students frosted their cupcakes ♥

I gave them each a sugar cookie heart to bake inside of their Mountain Dew Cupcake. (I told them the best ingredient you can ever bake inside of a cupcake is LOVE).


Mountain Dew Doritos Cupcake Recipe:
(The "Back To School" Version)
Makes about 18 Cupcakes


Ingredients:
1 box Lemon Cake Mix
1 Cup Mountain Dew (in place of water in the mix)
1/2 Cup Mountain Dew for dipping your cupcakes after they bake in a bowl to the side.
5 Tablespoons Granulated Sugar
1 T Lime Zest
1 small box instant lemon pudding (in dry powder form)
1 tsp lemon extract
1 Tablespoon lime juice
½ Cup Oil
4 Eggs
Doritos! (in any flavor you wish)

Optional Ingredients:  
♥1/2 Cup Crumbled Doritos to add to batter. (with this option you'll need a Freezer Size Ziploc bag and a rolling pin)
♥Americolor Gel Paste in Electric Green, Leaf Green, Electric Yellow

Method:
♥Before baking..zest your tablespoon of lime zest into a small bowl.

♥In a small bowl to the side, whisk the 1/2 Cup Mountain Dew and Granulated Sugar together. After you bake the cupcakes, you can dip your cupcakes in this mixture to saturate them in the Mountain Dew flavor ♥

♥Some like to add a Dorito only as a cupcake garnish, others like to crumble up and add the Doritos to batter so there are Doritos in the cupcake.  If you are going to add Doritos to the batter....Stuff Doritos inside of a large Freezer Size Ziploc bag.  Roll the rolling pin over the full Ziploc bag.   This will crumble the chips into little pieces,  and now they are ready to bake inside of a cupcake.

1. Pour your box mix into stand mixer.
2. Make sure you pour your Sundrop out of the can ahead of time into a bowl or clear measuring cup so it will lose some of its “fizz”. Once this is done, you can add to your box mix.
3. Add box of lemon pudding, in powder form to the mixture.
4. Add lemon extract, oil, and eggs.
5. Mix on medium speed for about 2 minutes until well blended.
6. Fold in lime zest (and Dorito crumbs if you desire) with a spatula.
7. Optional, for colored batter like pictured above: See my "Fantasy Rainbow Cupcake Tutorial" if you want to layer different colors of green or other color batters inside the cupcake. 
8.  Bake at 325 in cupcake tins (filled about 2/3 full) for appx 20-25 minutes or until a toothpick inserted into the middle of the cupcake comes out clean.
9. Once cooled, dip the cupcakes in the bowl of Mountain Dew/Sugar mixture to saturate the cupcakes in Mountain Dew flavor.

MOUNTAIN DEW FROSTING:
13-14 oz Marshmallow Cream
1 lb butter
2 Teaspoons of Lemon Extract
2 Tablespoons Mountain Dew
8-10 Cups Powdered Sugar
For Decorating:
♥Bag 'o' Doritos
♥Little Red or Yellow Heart Candies (they match the colors in the Mountain Dew logo)!
♥If you want to decorate like my rainbow swirls above, my "Fantasy Vanilla Almond Rainbow" tutorial will show you how!

1.  Use a spatula to scrape the fluff and the butter out into your stand mixer.
2.  Mix well until fluffy and well blended.
3.  Gradually add extracts and Mountain Dew for flavoring.
4.  Now add your powdered sugar, slowly until the frosting reaches desired consistency.  (The more powdered sugar you add—the more stiff the frosting will be for decorating).
5.  Last, but not least... Top Each Cupcake with a Dorito!


..If you didn't eat all your cupcakes, you can always turn them into...
Mountain Dew Doritos Cake Pops
(makes appx 30 1 1/2" cake balls)(Click here for a tutorial video)
You will need:
♥Baked Mountain Dew Cupcakes, cooled (see recipe above)
♥Baking Sheet Lined with Parchment Paper
♥Candy Melts
♥Candy Color (in any color you wish.  For Mountain Dew I like to use a dab of green candy color in the white candy melts, that gives it the light green color above).
♥Cake Pop and/or "Sucker" Sticks
♥Cake Pop stand or thick floral foam for cake pops to stand on while they are drying
♥Crumbled up Doritos in a small bowl.  I call them "Doritos Sprinkles" (see technique on crumbling in recipe above).

1.  Once cupcakes are cool, crumble them up into a large bowl or blend in a food processor until cake is all crumbs!
2.  In a large bowl, mix cake crumbs and small dabs of buttercream frosting until cake is a sticky "play dough" consistency. (sticky enough to form into a ball).
3.  Start rolling your cake balls-I roll them into 1" to 1 1/2" cake balls.
4.  Refrigerate until firm enough to dip into melted candy melts.
5.  While cake pops are in the fridge, melt candy melts in a deep microwave proof bowl (on the "defrost" mode until smooth and melted or in 15 second increments until melted.  Watch closely-if you over microwave, candy melts will burn).
6.  Add any candy color desired to your melted candy melts.

Cupcake Bonus: If you want the multi-color "swirl" look pictured above, this is how it's done:
♥Pour melted white candy melts into 3 different bowls.
♥Color each bowl of candy melts a different color (using candy colors of your choice).
♥Select one color as your base and add a tablespoon full of each color to your base.
♥"Twirl" and "Swirl" the colors you just added to your base with a toothpick.  Don't overmix or your colors will all blend together and get muddy.  The goal is for your candy melts to look "marbled" inside the bowl.

7.  Once your cake pops are firm enough for dipping, remove from refrigerator.
8.  Use your melted candy melts as "glue."  One at a time, dip the top part of each cake pop stick in candy melts, and stick 1/2 way down into each cake ball.  Let dry for a few minutes.  This will secure the cake pop stick into the cake ball. And..as magical as it is..you have a cake pop now instead of a lonely cake ball♥
9. Dip each cake pop upside down into the bowl of melted candy melts.  Do not graze the side of the bowl or push the cake pop down into the bottom of the bowl (cake pops are soft and delicate, they will fall off the stick if pushed up against the bowl. Twirl the cake pop gracefully in a circle in the "pool" of melted candy.
10.  Hang the cake pop upside down and lightly shake until the excess candy melts stop dripping off of the cake pop.
11.  Stick the cake pop right side up on stand or in foam to let dry.
12.  Sprinkle on the crumbled Doritos if you want to add Doritos.

If you decorated your cake pops using the "swirl" effect, they might look something like this:♥

Labels: , , , , , , , ,

Monday, August 19, 2013

Twinklies, Unicorns, Minions, and Throwing Glitter In The Air!!!

I made "Twinklie" Cupcakes.
Inspired by Twinkies.  I call them Twinklies. Because they *sparkle*.  Yellow Cupcakes..stuffed with Marshmallow Cream Buttercream..  Swirled with the same fluffy buttercream on top.  I made these awhile ago, when the world was sad and void of Hostess Twinkies.

You know what Twinkies have inspired (now that they have returned)?
Minion Cupcakes ♥ from Despicable Me.
I know you've seen them..all over the internet!
People turning Twinkies into yellow minion cupcake toppers!
I had so many friends posting the yellow Twinkie Minion Cupcake photos on my personal Facebook timeline, begging me to make them.   But I knew that I had to do something a little different. A little more Amanda Cupcake-esque.  Waiting is sometimes worth it because *I* was inspired when I went to see.....Despicable Me 2!

I made these:
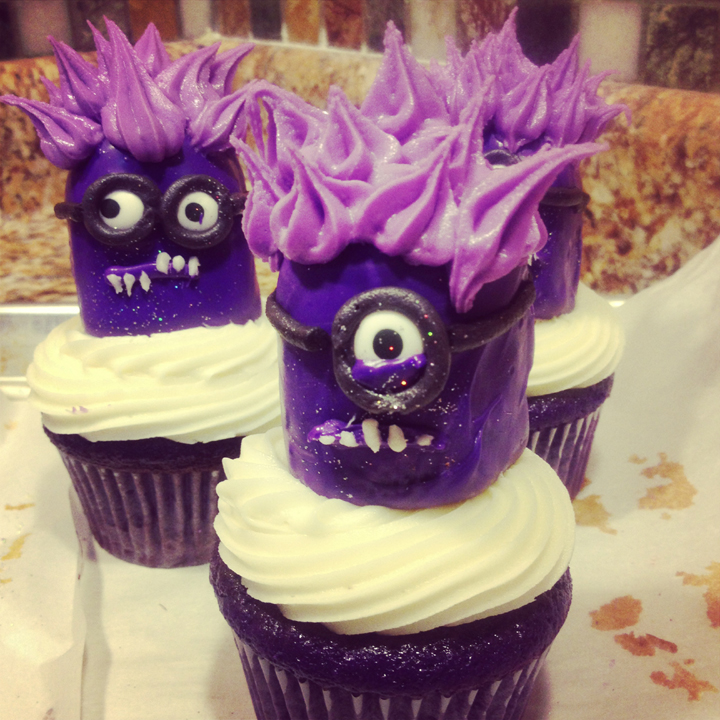
The Purple Minion Clones.
The whole movie Despicable Me 2 is based out of a cupcake bakery.
And when I saw the purple Minion Clones..I just knew they'd make the perfect cupcake minion army!Purple hair, funny chompy teeth, crossed eyes!  I love how the minion clones try so hard to be mean but they are still such kind souls underneath the purple. 

I cut Twinkies in half, and froze them for about an hour on a cookie sheet lined with parchment paper so they'd be solid enough to make it through a cupcake fondue process!  In the meantime, I melted white candy melts in  a deep bowl (deep enough to dip twinkies in).  I colored the candy melts with purple candy color gels after after the candy melts were melted and smooth.


These are my minions in progress.. after, dipping in purple candy melts, setting down on parchment paper and sprinkling on eyes.  I was thinking that the Minions might end up looking like Grimace (from McDonalds) or the ghosts (from Pac Man).  New inspirations for a cupcake in the future perhaps?!
How I got this far:  After the Twinkies were frozen, I dipped cake pop sticks in the melted purple candy melts, and immediately stuck them into the bottom flat side of the Twinkie to "glue" the Twinkie to the cake pop stick and let the cake pop stick set for a few minutes for easy dipping!

Hint:  It's easier to add eyes to the purple Twinkie clones while the candy melts are still wet.  It only took the eyeballs a few minutes to dry onto the Twinkie..and I was on my way to the next step....

Piping Goggles around the eyeballs!
Using a 7/16" Round Tip inside of a disposable piping bag.
I folded a few dots of black color gel paste into white buttercream to achieve the grey goggle color
Another Hint:  I love to make all my cupcake creatures look cross eyed (it gives them character--especially Minions!)  So  don't be afraid to have crazy fun sticking the eyeballs on the candy coated Twinkies!

I piped white teeth on to the Purple coated Twinkie using another small round tip.  The purple hair was piped on with a small open star tip.  (The "lavender" hair color was achieved by adding a small dot of purple gel paste color to white buttercream).   
I baked the cupcakes using my "Twinklie" recipe and colored the batter Regal Purple (using Americolor Gel Paste).  I didn't fill the cupcakes with the Marshmallow Fluff Buttercream, since the cupcake had to be pretty stable to hold the Minion Clones on top. 
However..
A Twinkie Coated in Candy Melts..
On top of a Cupcake frosted with Marshmallow Fluff Buttercream..was double the cupcake love.  Maybe even triple..
...or Army Sized Cupcake Love!! ♥♥♥
My Minion Clone Cupcakes.


Another reason I love Despicable Me..Unicorns ♥
Unicorn Cupcakes were simple.
♥Bugles-for the horns
♥Mini Pastel Licorice Candies for the ears
♥Sugar Eyes
♥Marshmallows cut in half for the noses
♥Edible Ink marker in black for the nostrils!
(if you want to know how to make the rainbow frosting, see my Rainbow Cupcake tutorial!)
"It's Beautiful!"
(this was a quote by Agnes referring to her pet unicorn in Despicable Me 2)!


Your own "Twinklie" recipe
Easy to bake at home ♥♥♥♥


Ingredients for the Cupcake:

1 Box of Yellow Cake Mix
1 Box of Instant Vanilla Pudding, as Powder (3-4 oz)
1 1/2 Cups Buttermilk
1 Tablespoon Vanilla
1/4 Cup Vegetable Oil
4 Eggs
Directions:
♥Preheat Oven to 325.
♥Line Prepared Cupcake Pans with 18 cupcake liners.
♥Using your stand mixer, blend ingredients together: Yellow Cake Mix, Vanilla Pudding, Buttermilk, Vanilla Extract, Vegetable Oil, and Eggs.
♥After 30 seconds of mixing ingredients together, scrape your bowl with a rubber spatula to incorporate all ingredients together.
♥Mix again for 1-2 minutes until batter is creamy.
♥Use an ice cream scoop to fill each cupcake liner about 2/3 full.
♥Bake in your oven at 325 for approximately 18-22 minutes or until toothpick inserted into the center of cupcake comes out clean.
♥Let cool before decorating.

Colorful Twinklies!
 
The Filling and Frosting
You can leave the cupcakes with the filling inside only without frosting on top.
Or..you can go the extra mile and pipe frosting on top of the cupcakes after filling.
Either way, this filling recipe works as both a frosting and a filling for the Twinklies.

Marshmallow Cream Buttercream Recipe
Ingredients:
14 oz Marshmallow Cream
1 lb butter-softened but not melted (yes, 1 lb. Everything is better with butter!)
1 Tablespoon Vanilla Extract
8 Cups Powdered Sugar or more, depending on how thick you want frosting to be.


♥Use a spatula to scrape the fluff and the butter out into your stand mixer.
♥Mix well until fluffy and well blended.
♥Gradually add vanilla extract.
♥Now add your powdered sugar, slowly until the frosting reaches desired consistency.
(The more powdered sugar you add--the more stiff the frosting will be for decorating).
Decorating:
♥Use a cupcake corer to form a hole in the center of your Twinklie Cupcakes.
♥Slide an open star tip down to the end of a disposable piping bag and cut a hole large enough to fit the piping tip.
♥Fill your piping bag with the Marshmallow Cream Buttercream you just made.
♥Now fill the inside of your cupcake and continue to swirl on top of the cupcake, as pictured above!
♥Sprinkle with edible sparkles, gems, or confetti! Whatever you fancy ♥
♥...or..don't fill it all and top it with a Twinkie disguised as a purple Minion!!
"Always be yourself unless you can be a unicorn. Then always be a unicorn."
Yes my cupcake friends here are...Wearing Unicorn Horns, Throwing Glitter in the air, and Making Wishes at my Cupcake Mansion in New London ♥♥

Labels: , , , , , , , , , , ,

Tuesday, April 9, 2013

Fantasy Vanilla Almond Rainbow Cupcakes ♥

A true story & recipe by: Amanda Cupcake

One Starry Starry Night while everyone else was dreaming, I swirled fantasies on top of cupcakes.
Little fantasies that tasted like vanilla almond rainbows.   At the first warm & colorful bite of my rainbow cupcake creation, I "remembered" that I had "forgotten" a wild food fantasy from the days before anyone ever called me Amanda Cupcake.  


Back in my angsty teen days, I was a painter.  Art was my favorite class, painting was my outlet.  Even back then though, my instincts yearned for something beyond paint.  I wished that I had the tools to create *edible* art that had never been seen before.  Paint that I could eat.  I started envisioning a new colorful creation. Ice cream themed after famous paintings. Like Van Gogh's Starry Night--inside of an Ice Cream Carton.  I envisioned myself opening the carton to reveal a frozen replica of my favorite legendary painting..as ice cream. I thought that the neatest thing ever would be if I could dip my spoon into a soft dairy canvas, and as the ice cream melted, the "paints" would  blend together into brand new colors I never even knew existed.  Sort of like Superman Ice Cream..but more "fantasy" than comic strip.

Wow..so....
My rainbow fantasy cupcakes that I dove into, buttercream first.. were a real life version of "paint that I could eat."   My teenage fantasy come true. Even though this wasn't ice cream, the colors in the frosting and inside of the cupcakes evolved with every single vanilla almond bite. Just like my vision.
And the best thing ever...I actually did create these cupcakes on a starry starry night.  The starry starry night can be recreated on the cupcake by lightly sprinkling Hologram Silver Disco Dust on top of fresh frosting!

Disco Dust: There have been many questions about the Disco Dust being "edible". Here's my answer:   I use it on the cupcakes on my blog to make everything look super sparkly and fancy.  I don't sit down and eat it by the spoonful.  It sells at my local cake decorating supply store, and I put it on top of things that you can remove from the cupcake.  You can use crystal colors pearl dust or use crystallized sugar sprinkles that are at your local bulk food supplier, I do that for the cupcakes I use in production to get the same effect. If you think about all the things people eat or drink in this day and age, a little bit of glitter is pretty innocent, so if you want to sprinkle a tiny bit of disco dust on your cupcake, I know from experience working with it and eating cupcakes that have it on it for several years that it basically just passes through your system harmlessly. You might end up with a little bit of "unicorn" glitter poo.


You too..can make Vanilla Almond Rainbow Fantasy Cupcakes:
Your Fantasy Vanilla Almond Rainbow Cake Mix Recipe:
  • White Cake Mix (no generic labels, brand names only)
  • 1 1/4 Cups Buttermilk (in place of the water on the box)
  • 4 eggs
  • 3.9-4 oz White Chocolate Pudding in Dry Powder Form (the pudding gives it that "from scratch" texture).
  • 1 1/2 teaspoons of Pure Almond Extract
  • 1/2 Cup Vegetable Oil
  • Disposable Piping Bags (for layering the rainbow colors on top of each other in the cupcake liners)
  • Light colored cupcake tin (a light colored tin works better than dark so that your bright colors don't brown when baking)
  • White Cupcake Liners (this recipe makes about 12-15 cupcakes)
  • Oven, Preheated to 325.
A friend is always good to bake with. ♥ I'm lucky to have two of the cutest little friends ever, Hanna and Rainy. I call them my "Mini Me's'"


My edible paint colors that I swear by for fantasy rainbow cupcakes and their frosting.  Americolor Gel Paste in Electric Pink, Electric Yellow, Sky Blue. (You can buy these here or at a local cake decorating supply store).

Step 1: Combine all ingredients in stand mixer and whip together well using flat beater attachment.
Step 2: Take out 3 separate bowls and pour about 1 1/2 Cups of batter in each bowl.
Step 3: 
♥For Sky Blue:  Mix two small drops of Americolor Gel Paste in one Vanilla Batter Bowl.
♥For Electric Pink:  Mix three to four small drops of Americolor Gel Paste in a separate Vanilla Batter Bowl. 
♥For Electric Yellow: Mix three to four small drops of Americolor Gel Paste in a separate Vanilla Batter Bowl. (I use more drops of color for the yellow and the pink so that the colors are really vibrant).
Step 4:  Stop and gaze at the beauty of your bright batter colors in each separate bowl.


Pour each color of batter into a separate disposable piping bag, and cut a small hole at the end of the piping bag.

♥Cover the bottom of your cupcake liner with electric yellow batter.
♥Repeat by piping electric pink on top of your electric yellow batter.
♥Repeat again by piping Sky blue on top of your electric pink batter.
♥Now you can add little swirly swirls of extra color, until your cupcake liner is filled 1/2 full.
♥Bake at 325 for appx 18-22 minutes, until a toothpick inserted in the center comes out clean.

..and taste test. I did. The cupcake is...gone!
Look how pretty the cupcake liner looks alone! You don't even need to buy the fancy schmancy ones at the store.  This started out as a plain white cupcake liner.

The Pastel Rainbow Fantasy Frosting technique:
(it's truly magical).

REAL BUTTER IS LOVE ♥
I use a homemade buttercream for the best swirl texture.
1 Lb of  Unsalted  Softened Butter in my Buttercream Recipe ♥


I swear by Marshmallow Creme as the base for my frosting.
I use 13-14 oz in my frosting recipe.
See full recipe for buttercream frosting below.

♥Just a reminder of how pretty the frosting is♥

Just like my batter, I separated my frosting into 3 bowls.
Then I mixed each gel paste color into a separate bowl (about 3-4 drops per bowl--you can always add more color if you want the color to come out more vibrant). 
Electric Yellow, Electric Pink, Sky Blue.

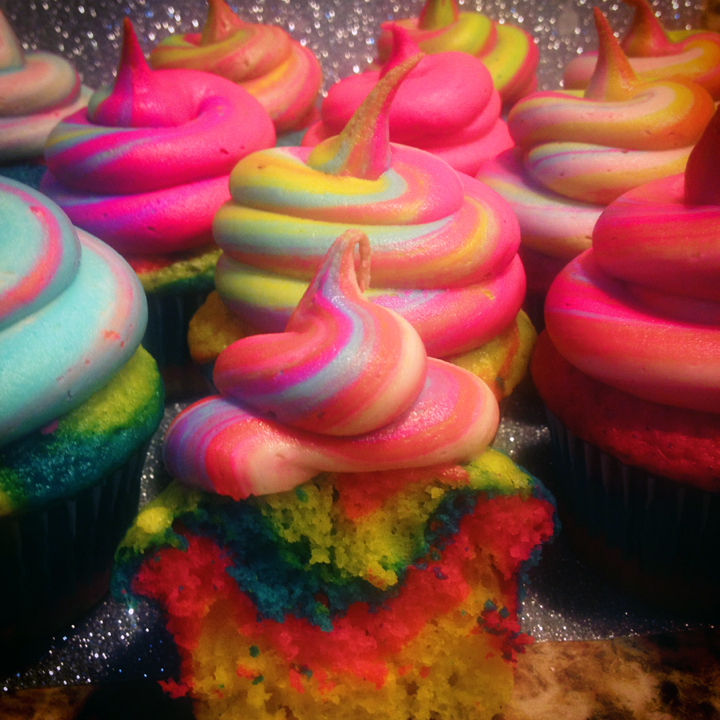
Hint: If you want your frosting to look more "Unicorn-esque" like these cupcakes... (these colors remind me of Unicorns!), I use white in place of yellow. Or still use the yellow but add white too as a 4th color.

To pipe a multi-color rainbow swirl:  I stacked each color of frosting on top of one another inside of a disposable piping bag. ♥  Your piping bag will look so pretty from the outside, like this!


  This is the view from the inside of the piping bag, as I am stacking the sky blue, electric pink, electric yellow buttercream frosting colors on top of each other.  

 For a dreamy puffy fantasy swirl, I use a round Wilton 1A Piping Tip like in the picture.  Before you stack the frosting inside of the piping bag, cut a hole in the end of the piping bag big enough to fit the tip, and slide the piping tip down into the end of the piping bag.  

♥No cupcake will look the same.  When all three-four colors blend together inside the piping bag you'll start seeing greens, purples, turquoise colors swirl a fantasy rainbow onto your cupcake! 

♥Where you might need patience:  For the brightest colors possible, switch piping bags every time your piping bag runs out of frosting. This prevents colors from turning muddy or brown.

The final product.  My signature rainbow fantasy cupcakes.
Maybe this summer..fantasy rainbow ice cream cupcakes?! ♥♥♥


Marshmallow Creme Buttercream Frosting Recipe:
13-14 oz Marshmallow Fluff or Cream
1 lb butter
1 T Vanilla Extract
Dash Salt (to lessen the sweetness a tad)
8 Cups Powdered Sugar (depending on how thick you want your frosting to be-use less for creamier frosting and more for thicker swirls)

  • Use a spatula to scrape the fluff and the butter out into your stand mixer.
  • Mix well until fluffy and well blended.
  • Gradually add a pinch of salt and vanilla extract.
  • Now add your powdered sugar, slowly until the frosting reaches desired consistency.
  • (The more powdered sugar you add—the more stiff the frosting will be for decorating).

    End of the blog BONUS:

Some may also call my rainbow cupcakes  "Unicorn Poop" Cupcakes. Or you can just make Unicorns out of these cupcakes like I did here! I used Bugles as the horns, sugar eyeballs as the eyes, marshmallows cut in half for the nose and I drew the faces on the 'mallows with an edible ink marker.  Last but not least, I used little rainbow colored licorice pieces for the ears! Reminds me of the "Fluffy Unicorn" in Despicable Me!

Labels: , , , , , , , , , , , , , , , ,

Monday, June 4, 2012

Do you want S'more?!

Can you tell I keep coming back for S'more?
This is the Amanda Cupcake S'more Hall of Fame:
(I can't believe I did all this in a year....)

The S'more Sparklette.
Summer Nostalgia in a cupcake. ♥
See the recipe and try it here.


The Inverted S'more Pop.
(A Marshmallow Stuffed with Chocolate Cake, Hershey Bars, dipped in chocolate, sparkling with graham cracker crumbs).


The Jelly Belly S'more Cupcake.
Inspired by Jelly Belly's Cupcake Contest.
Toasted with marshmallow Jelly Belly Beans♥
See the story here.

  
I find it awesome that I sent out 15 S'more Sparklette Cupcakes in a jar to my friend in Texas last year. ♥


And now I have created a new S'more thrill.
S'mores on a stick♥
Yes, there's so much love in between these graham crackers that the marshmallows are spilling out the sides. ♥ This much sticky mushy wonderful love cannot be contained.

Unspoken S'more Code:
It's okay to get sticky.
It's all part of the process.
S'mores don't need to be perfect, they actually taste better when they are a beautiful disaster.

I broke my graham crackers into little vertical squares and placed them on a cookie sheet lined with parchment paper.   I topped the graham crackers with mini marshmallows because I figured the regular marshmallows would practically explode once I put them in the oven. The future s'more pops bake in the oven at 350 for about 5 minutes, or until the marshmallows start to fluff and turn golden brown on top. ♥

Curiosity killed me. There is something really fun about seeing marshmallows fluff up to XXL size.  So I also made some s'more pops with regular sized marshmallows.  This is how puffy the marshmallows are after being in the oven for just 5 minutes! ♥

I immediately insert a lollipop stick into the warm marshmallows.

I smoosh the marshmallow between 2 graham cracker squares on the pan and let them cool. ♥  The sticky-ness of the marshmallows is like glue. The stick and the graham crackers will all stay together once the s'more pop cools. 

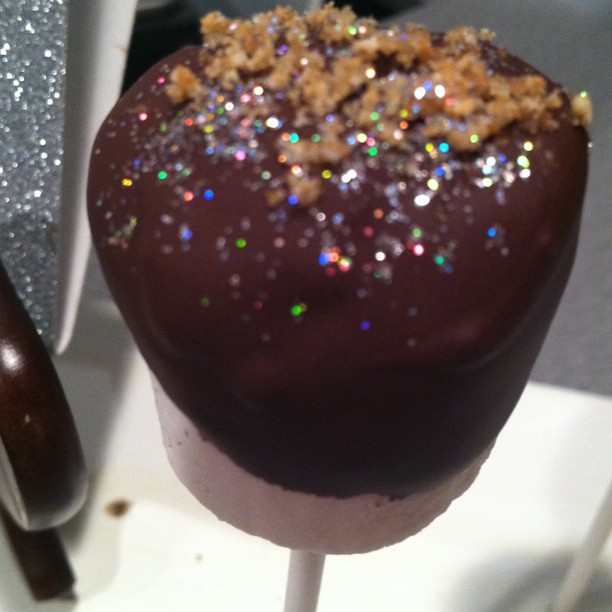
I dip my s'more pops of love into melted dark chocolate candy melts and sprinkle them with disco dust sparkles.  As you can tell, this s'more pop was made using one of my giganto marshmallows.  ♥ it.  If you really want to have fun like the big kid that you are, use the regular marshmallows and make a mess!


Sticky Gooey Sparkly Chocolatey.


The way S'mores started.
On a Stick♥.


Labels: , , , , , , , , ,

<data:blog.pageTitle/>

This Page

has moved to a new address:

https://theamandacupcake.com

Sorry for the inconvenience…

Redirection provided by Blogger to WordPress Migration Service